Contents
- Index
- Next
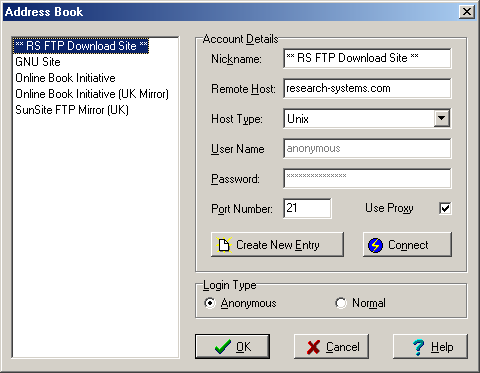
Address Book
This is a screen shot of the RS FTP Address Book Window.
Click on an area of the graphic to view its associated help information.
The Address Book is invoked by selecting either the Address Book option on the File Menu or by clicking the  button of the toolbar.
The following is a list of operations that you can perform whilst the Address Book Window is displayed.
Creating a New Address Book Entry:
To create a new Address Book Entry first click on the Create New Entry button, this will create a new entry with the temporary Nickname of "New Entry". If you are currently connected to a Remote Host then the other details will be filled in for you. All you have to do, in this instance, is to modify the Nickname to a more meaningful name that corresponds with the site to which you wish to connect.
If you are not currently connected to a Remote Host then you will need to fill in all the fields in the Account Details section of the Address Book Window, as well as selecting the required Login Type. To correctly fill in this section you can follow the steps below:
Change the Nickname to something meaningful.
Enter the Remote Host Name.
Select the Host Type. Currently all host types are Auto detected, so this can safely be left as "Autodetect".
If you want to log into this host as an Anonymous User then click on Anonymous in the Login Type section of the Address Book Window. This will fill in both the User Name and Password based upon the Anonymous Settings in the Identity section of the Settings Window.
If you have an Account on the Remote Host then enter both your User Name and Password into their respective fields. Note that these fields are optional, if you leave them empty then you will be prompted for the details when you attempt a connection to the Remote Host.
Enter the Port Number that the Remote Host expects FTP connections to be made on. In general this will be 21.
If the Remote Host is on a local network, for example a corporate Intranet, then the Use Proxy check box may be left unchecked. However, if you are connecting to a Remote Host through either an ISP or corporate firewall, then the Use Proxy check box should be checked.
To save the Address Book changes you may now click on the OK button if, however, you would like to connect to the Remote Host then click on the Connect Button. If you would like to discard the Address Book changes then click on the Cancel Button.
Selecting, or Connecting to, an existing Entry in the Address Book:
To select an existing entry in the Address Book you may either:
Click on the Nickname in the Address Book List, then click the Connect Button or.
Double Click on the Nickname in the Address Book List.
If the User Name and Password fields are blank then you will be prompted for these details when a connection is established with the Remote Host.
Removing an Entry from the Address Book:
To remove an existing entry from the Address Book you can use one of the following methods:
Click on the Nickname in the Address Book List and press the Delete key on the keyboard or,
If the Nickname of the entry that you want to delete is not selected then select it by clicking the left button of the mouse whilst the cursor is over the required entry. Click the right mouse button and chose "Delete" from the pop-up menu that will be displayed.